For the past month or so I have been exploring React a lot. Although I can definitely say I still don’t have a complete grip on what it is and what it can do, I have seen enough examples of it to document my journey with it so far. This post will describe how I went about designing a simple React page and connected it to a Google Sheet. The difference between displaying a Sheet as is on a web page and it acting as a data source for a front-end application like React is the user friendliness of it. What I was trying to accomplish is presenting my Sheet data in some sort of user-friendly manner that can be viewed on any device.
What is React?
React Native is a open source mobile application framework developed by Facebook. Released in 2015, it has grown tremendously over the last few years. The ability to create robust mobile applications using JavaScript is a pretty promising feature. Check out this informative video below which goes into some detail about all this.
There are several websites filled with examples of React applications. Some of the popular ones are listed below.
- Example Projects in React – A good repository of ideas that you can get started on. Also contains links to source code on Github for you to explore.
- React.js Examples – A good collection of React components and pages that showcase various features. From elegant form fields to dynamic table design layouts, this site also has some good ideas for you to draw from.
- React Rocks – Another site that has a wide range of examples including movie search (with OMDB’s API) and other applications.
Where to begin?
This took a little time to figure out. After a few trials and errors, the following sequence seemed like the right one. If there is a better one please let me know since I am learning this as I go!
- Install Node.js – The very first thing I did was downloaded and installed Node.js for Windows (my OS). This is an open-source, cross platform JavaScript runtime environment. This allows you to create JavaScript code and run it outside of a browser.
- Installing “create react app” Node Package – The page linked to this title was useful with the commands I needed to type on the console. The npm (node package manager) is a pretty important command that is used to both create new projects (which in turn creates a lot of files and folders) and to run the project in a server environment.
npm install -g create-react-app - Creating your project folder – Once the previous two steps are done, the next step is creating the project folder where your application will be written. Since this example is about hooking up a React application to a Google Sheet I will create the folder react-sheets-link
npx create-react-app react-sheets-link - This takes a few seconds and creates the folder and some very important files inside it (with sub-folders). Of all of these the two files which are important at this stage are : index.html (default landing page for the project) and app.js (the core javascript file which does all the connecting and displaying work with the Sheet). You can find the index.html in the public folder and app.js in the src folder.
- The next step is to start the development server environment on your computer. This basically opens up the default web page that will run the package for the folder you are in. The contents of app.js will be displayed. The command to do this is given below.
C:\react-sheets-link>npm start
The default page will look like this.
Setting up the Sheet connection
If you have made it this far, congratulations! This above process, thanks to dozens of distractions, took me a week. So once I realized what was happening with the npm and app.js connection, things slowly started to fall into place. Next thing I did was look up a tutorial that showed me how to code the portions of app.js that would recognize a Google Sheet. For this, I used the following tutorial.
Using React + Google Sheet as your CMS
While going through it I learned that to hook up to Google’s API service I needed to install a node package called tabletop on NodeJS. So I did that with the following command.
npm install tabletop
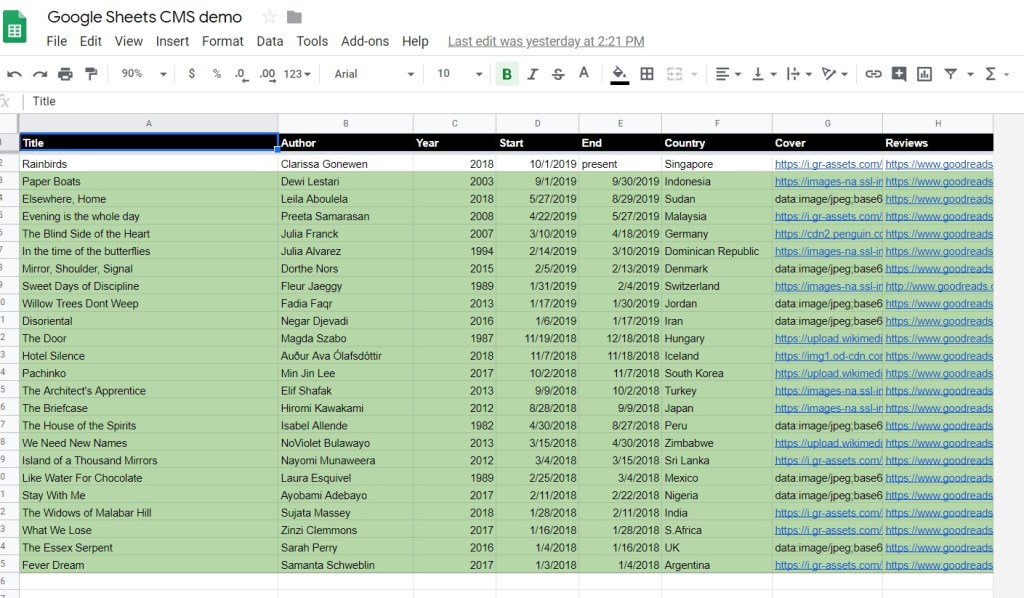
Once this was done, I set up my Google sheet so that I had everything in it I needed to display on my React application page. This is a Sheet that holds information on all the books I have read since Jan 2018. Each column has some important information about the book that I was displayed on the app page. There is also a Cover column with direct links to the book covers and Reviews column that links to the Goodreads review page for that book.
Once this was done I choose File -> Publish to the Web and copied the Sheet Key from the Google sheet’s URL. This is very important since we will be using this key within app.js to connect the application to the fields.
The almighty app.js
Now comes, in some ways, the final piece. Adding in the required code to app.js which will result in the application I am trying to design. Presented here is the complete code for this file. Some important parts of the code.
- Importing of all the required packages, including TableTop
- App.css (also in the /src folder) can be used for styling the output. I used it to resize/replace the logo and some color changes.
- The constructor() method is super useful for binding different states of an object. Since there is no event happening (like a click or request from user) I am leaving it as is.
- componentDidMount() method uses the Sheet key I had copied earlier and establishes a connection and loads the column values as an array in data.
- render() is the final piece that reads the data and renders the output as designed by the HTML tags around it. I am using the image cover to be displayed in <img> and the link to Goodreads reviews as a Hyperlink to the Title of the book.
import React, { Component } from 'react';
import logo from './logo.png';
import './App.css';
import Tabletop from 'tabletop';

class App extends React.Component {
  constructor() {
    super()
    this.state = {
      data: []
    }
  }

  componentDidMount() {
    Tabletop.init({
      key: '1rDbZqPYNaJZDmznIQCXyxbb55Jf6ppJrDZhHY_pdzng',
      callback: googleData => {
        this.setState({
          data: googleData
        })
      },
      simpleSheet: true
    })
  }

  render() {
    const { data } = this.state
    return (

      <div className="App">
        <header className="App-header">
          <img src={logo} className="App-logo" alt="logo" />
          <h1 className="App-title"><font color="black">i.(am).read(ing)</font></h1>
        </header>
         <div id="book-details">
          {
            data.map(obj => {
              return (
                     <div key={obj.Title}>
                         <h1><a href = {obj.Reviews}  target="_blank"> {obj.Title}</a></h1>
                         <b>{obj.Author}</b>
                        <p>{obj.Year}, {obj.Country}</p>
                        <p>{obj.Start} - {obj.End}</p>
                         <img alt={obj.Cover} src={obj.Cover} height="300" width="200"/>
                      <hr class="new1"></hr>
                      </div>
             )
            })
          }
        </div>

      </div>

    );
  }
}

export default App;
Final Output?
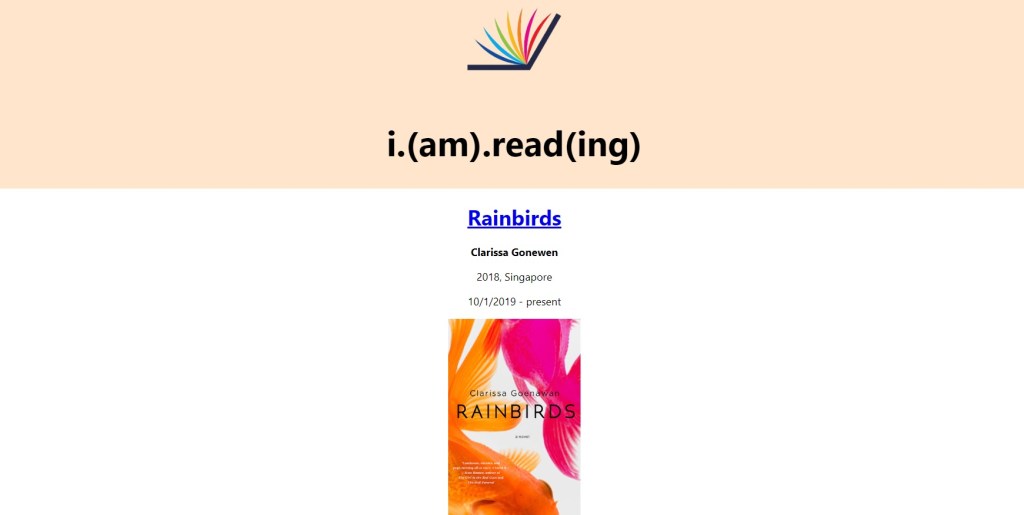
Success! As you can see it has made the title a URL that goes to the Goodreads page, listed all information one below the other and the cover of the book is displayed as an image with set size. Now every time I make a change to the Google sheet, this application will be automatically updated.
You can see the full demo of this application here : Reading List Demo
Deploying the React app to Git Pages
This was perhaps the most complex of them all. It took a solid couple of hours to figure out how to publish my React application folder properly to the right branch of Github’s Pages. The difference between a Github folder and a Page is that the Page allows scripts to be deployed and run. Hence making it the perfect place for React applications. After going through various YouTube tutorials and documentation with varying degrees of success I found this short and precise video that walks you through the process.
The process is as follows:
- Set Up GitHub Pages repository : GitHub allows for web hosting with its Pages feature. So essentially you can design and publish your entire site onto GitHub. This also means you can deploy script based front-end application pages onto it too.
- Create a repository for your React app : Once the Pages is set where the address is <username>.github.io then you need to set up a repo for your React app. In my case it is called readinglist.
- Install gh-pages : On your command console run the command npm install gh-pages –save-dev so that any future application you create and push to GitHub pages will automatically go via the gh-pages branch.
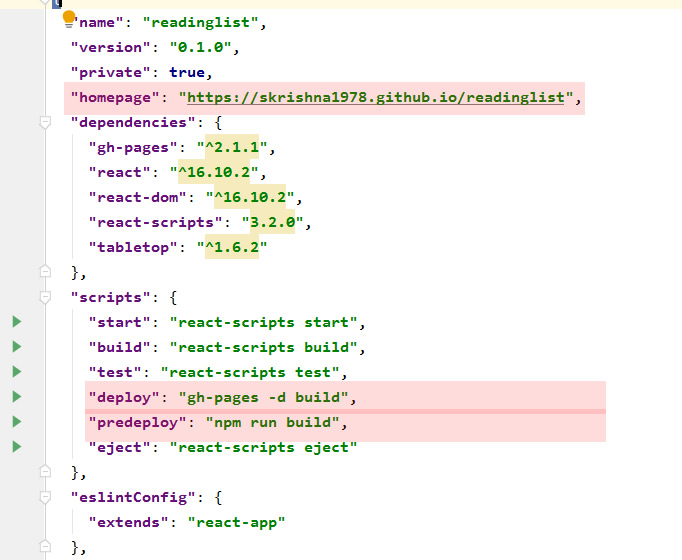
- Updating package.json : This is perhaps the most critical piece. For React to successfully build and deploy your application the package,json file is referred to. This file was already created when you created the initial app. So open it and add the following text to it. The highlighted parts show the homepage URL where the app will sit and the deployment commands to build the app and publish it to Pages.
Finally, run the build with git run deploy and this will publish your app to the URL indicated in the Json file.
Takeaways and next steps
- Like any learning experience the process can be complicated for people not familiar with either GitHub or with app creation. So take your time with this and read as much documentation/see tutorial videos as you can to experiment.
- Learn from the errors. Error messages and problems are excellent guides to telling you what it is you need to be focusing on. It does get frustrating but having the right guide with you (such as the videos and docs) is always handy.
- Visit dev.to and search posts such as this one where there are shorter more concise instructions about all of this.
- Once you successfully build and deploy your first React app then it gets easier from there.
- Duplicate but eventually Innovate : It is absolutely fine to create an application that does exactly as a tutorial but it is important to also add features, components to it that make it original. So keep your creative thinking working on what sort of stuff you wish to add it to it and then focus on learning those.
This was a fun project. I look forward to designing more interactive applications with React and Pages. I also look forward to exploring what else I can add to the ReadingList application to make it more informative and user friendly.
